Hi @dalemccrory , good news. I’ve set up the perfect working setup with Qovery (Thanks to the Windmill team). So here is how you can leverage Windmill with Qovery.
Create Postgres DB
With Qovery, create a Postgres database.
- Inside your environment, click on
New service>Create datasbase. - Select Postgres, give a name and pick
Managed modeif it’s for production purposes. - Postgres Version 15 or latest
- Accessibility → Private
- Click on
ContinueandCreate
Deploy Windmill Helm Chart
Here, we will use the official Windmill Helm Chart.
- Add windmill helm repository to Qovery

- Create a new Helm service inside your environment

- Specify the general config and click
Continue

- Click on
Raw YAMLfile source (or use Git if you want) to specify your Helm values file.

Here is the yaml content you can copy paste ![]()
postgres:
  enabled: false

windmill:
  databaseUrl: qovery.env.DATABASE_URL
  # -- domain as shown in browser, this variable and `baseProtocol` are used as part of the BASE_URL environment variable in app and worker container and in the ingress resource, if enabled
  baseDomain: qovery.env.BASE_DOMAIN
  # -- protocol as shown in browser, change to https etc based on your endpoint/ingress configuration, this variable and `baseDomain` are used as part of the BASE_URL environment variable in app and worker container
  baseProtocol: http

  # extra worker groups
  workerGroups:
    # workers configuration
    # The default worker group
    - name: "default"
      replicas: 3
      # -- Annotations to apply to the pods
      annotations:
        qovery.annotations.service

      # -- Labels to apply to the pods
      labels:
        qovery.labels.service

    - name: "native"
      replicas: 4
      # -- Annotations to apply to the pods
      annotations:
        qovery.annotations.service

      # -- Labels to apply to the pods
      labels:
        qovery.labels.service

  # app configuration
  app:
    # -- Annotations to apply to the pods
    annotations:
      qovery.annotations.service

    # -- Labels to apply to the pods
    labels:
      qovery.labels.service

  # lsp configuration
  lsp:
    # -- Annotations to apply to the pods
    annotations:
      qovery.annotations.service

    # -- Labels to apply to the pods
    labels:
      qovery.labels.service

  # multiplayer configuration
  multiplayer:
    # -- Annotations to apply to the pods
    annotations:
      qovery.annotations.service

    # -- Labels to apply to the pods
    labels:
      qovery.labels.service

ingress:
  enabled: false

serviceAccount:
  # Specifies whether a ServiceAccount should be created
  create: true
  # The name of the ServiceAccount to use.
  # If not set and create is true, a name is generated using the fullname template
  name: ""
  annotations:
    qovery.annotations.service
You should get something like this

Then click on Continue.
- Then click on
Continueuntil you can create your Helm Chart

Congrats, your helm chart is created inside Qovery (but not deployed yet).
Reverse proxy with Caddy
Windmill uses 2 services that must be exposed to the same domain to work properly. That’s why we will not use the Qovery Helm Networking part, but we will expose a Caddy container image with the appropriate configuration.

LSP is useful to provide auto-completion into the web windmill IDE - it’s not a mandatory component, but it’s more convenient for the end user.
Caddy Deployment
- Go back to your Qovery environment where Windmill helm chart is, and click on
New ServiceandCreate Application.
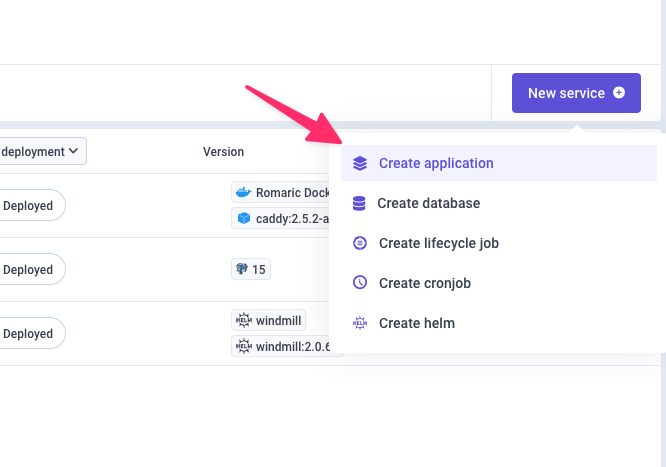
- Complete the general information. Pick the Docker Hub container registry and specify the
caddyimage and the version2.5.2-alpine

-
Click
Continueand leave the default Resources values (you can change them afterward if needed). -
Add a port 80 and expose it publicly. Then click on
CreateandContinue.

-
Then click on
Continue(or properly configure the healthcheck - recommend). -
And click on
Create

Well done; your proxy is now ready to be deployed. But before, we need to configure the environment variables now to interconnect our services.
Env Vars configuration
We must configure some environment variables we defined inside our helm values file. Like:
- DATABASE_URL → to connect to the Postgres database
- BASE_DOMAIN → to provide Windmill with the public domain that will be used.
- CADDY_CONFIG → to provide the reverse proxy configuration to properly route the traffic between the Windmill app and Windmill LSP
DATABASE_URL
- Click on your Windmill
Variablestab. - Create an Alias
DATABASE_URLonQOVERY_POSTGRES_Z..._DATABASE_URL_INTERNAL. Set the scope toservice. - Create it.
You should see something like this:

BASE_DOMAIN
- Click on your Windmill
Variablestab. - Create an Alias
BASE_DOMAINonQOVERY_CONTAINER_Z..._HOST_EXTERNAL. Set the scope toenvironment. - Create it.
You should see something like this:

CADDY_CONFIG
- Click on your Proxy
Variablestab. - Create a New Variable as a File.

- Complete the fields:
3.1 Variable →CADDY_CONFIG
3.2 Path →/etc/caddy/Caddyfile
3.3 Value →
http:// {
        bind 0.0.0.0
        reverse_proxy /ws/* http://windmill-lsp:3001
        reverse_proxy /* http://windmill-app:8000
}
3.4 Scope → Service

Well done, you’re ready to deploy your environment now.
Deployment
Deploy your environment with Windmill

Once your environment is deployed, you must be able to access the public URL provided by the proxy to access your windmill instance ![]()

Hope it helps ![]()